
This is what we all want right? More summits, trails, climbs, paddles….time spent with friends and loved ones enjoying beautiful spaces. Most of us don’t want to spend hours laboring over gear maintenance. While I’ve learned to love it, call me strange but hear me out-I’ve come to hate replacing an item that wasn’t well cared for.
I’ve mentioned it in nearly every post about how we prefer to spend up front, maintain that item and make it last to save money long term. So I felt it was time to write about maintaince and some repair.
I know we’ve talked some about how Brandon and I met; guiding. We started that season as unpaid Interns. For the particular guide company (non-profit) we worked for, Interns were the PFD’s that kept that place afloat. Not to say is was sinking, just that a lot of back-breaking work was done by Interns…where am I going with this? Non-profit guide companies can’t spend money replacing gear-how was it maintained? Interns! Follow? We spent hours-washing boats, tents, packs, dishes and repairing zippers, camp chairs, and dry bags. We learned a lot. And learned to appreciate that with some work upfront, you can make a great item last for years! Here are a few of our tips!
Wash your stuff!

Hannah, why did you post a picture of cleaning products on your dingy top-load clothes washer? Because, to quote Pitch Perfect, “This shit, is real life!” We don’t have a fancy front-load washing machine, we don’t have a beautiful esthetic laundry room, we have the washer and dryer that came with the house in the basement. Work with what you’ve got, right?
I love Nikwax-I have no relationship with the brand but if they asked….yeah-and they have a cleaning solution for almost everything. What’s missing from that photo? Tech Wash!!! I think I’m out. It is my most used wash from Nikwax. Tech wash is what we use for our tent, packs, synthetic insulation, waterproof items etc. Naturally it gets used most often.
If you aren’t using Down Wash for your down items you are throwing away money. It is so simple. Notice I keep saying “wash” since they aren’t really ‘detergents’. Detergents can break down the loft of down, which is what gives it the fluffy insulating qualities we love it for. Down Wash helps to restore that loft, you can also use the Down Proof to add a little water repellency to your down stuff.
I use the Tx.Direct spray more often that the wash-in, since it can leave a bit of a film. But once my tent or rain gear is clean, if it needs a little help with the water-proofing-you can give it a hit with the spray. Directions for use and what fabrics are appropriate are of course on the bottle and their website. I know I’ve mentioned it, but your waterproof, breathable items like Gore-Tex have pores-so they must be clean to be both waterproof and breathable. If you still haven’t picked up some great rain gear-read my thoughts here!
I really like to use the Base and Wool Wash at the end of the winter season when my base layers get the most use. I wear mostly wool base layers which avoid the funk, but Brandon wears mostly synthetic. No matter what, the Base and Wool wash can improve the breathability and quickdry-ability in your base layers. Again, need advice on base layers? Check out this post!

When I say “wash your tent” I mean it. This tent shown is over a decade old with pretty regular use. We do a few things to help it; like never wear shoes inside, close the zipper carefully, use a footprint and wash it after use and put it away DRY. Mold kills most outdoor stuff. A lot of things are hard to get dry or store without moisture. Once mold comes in, it’s hard to get out without damaging the item. So start by making sure your tent is clean, and then give it time to reallllllly dry.
Once we get home (and we’ve allowed ourselves a day to clean before going back to work if possible) we will spray any obvious debris off the tent. We are fortunate to have a backyard; so we fill 2 large tubs from the dollar store. 1 is for cleaning (with Tech Wash) the other is for rinsing. Close all the zippers so you are less likely to snag the mesh. From here we set up a large line and dry everything! Again, we never place the mesh on the line to avoid tearing it-always hang from the underside. This is also our time to inventory and inspect for any repairs that need to be done. If anything needs tending to, it won’t go back to it’s place until it’s fixed. This ensures that any item on the shelf is ready to be packed for adventure at any time! Way less heartache that way.
Whatever packs we’ve taken will get spot cleaned and often dunked, dried and then checked for abrasion spots that might need patching. Zippers on tents that are sticky might get a little wax job, any holes in the fly or mesh will be patched. Nothing is left untouched, even the tent stakes are washed. All of what I would classify as ‘hard goods’ (not things that I can put in the washer) will get washed this way. Stuff sacks, dry bags, sleeping pads (usually just dried for this one) chairs, tarps, PFDs….they all get dunked and dried. Not everything will dry that day, especially if it’s humid-so we’ll do a second staging for things to dry all over the house until we feel they can be put away.

Things like to be stored with air. Sleeping bags should never be stored in their compressed state-but rather in the large storage sack (mesh usually) they often come with. REI sells mesh bags for under $15 if you misplaced yours or a spare pillow case usually works great. *Same goes for sleeping pads-always store them with some air in them, especially if they are ‘self-inflating’ meaning they have some foam inside. Wanna keep your coolers from smelling skunky but don’t have the space to store them open? We’ve found a bandana works great to prop them open just enough, and you can still stack them if you need to. If you’re anything like us, you have a few water bottles, I love this shoe rack for keeping bottles from tipping over with the lid dangling off the side. Get one from Amazon here!
*If you have a puffy jacket or a waterproof jacket that boasts the ability to ‘store in its own chest pocket’….don’t leave it that way. Those fabrics need to breathe.
What’s the saying about “an ounce of prevention…”? That’s really the bulk of gear maintenance….preventing icky.
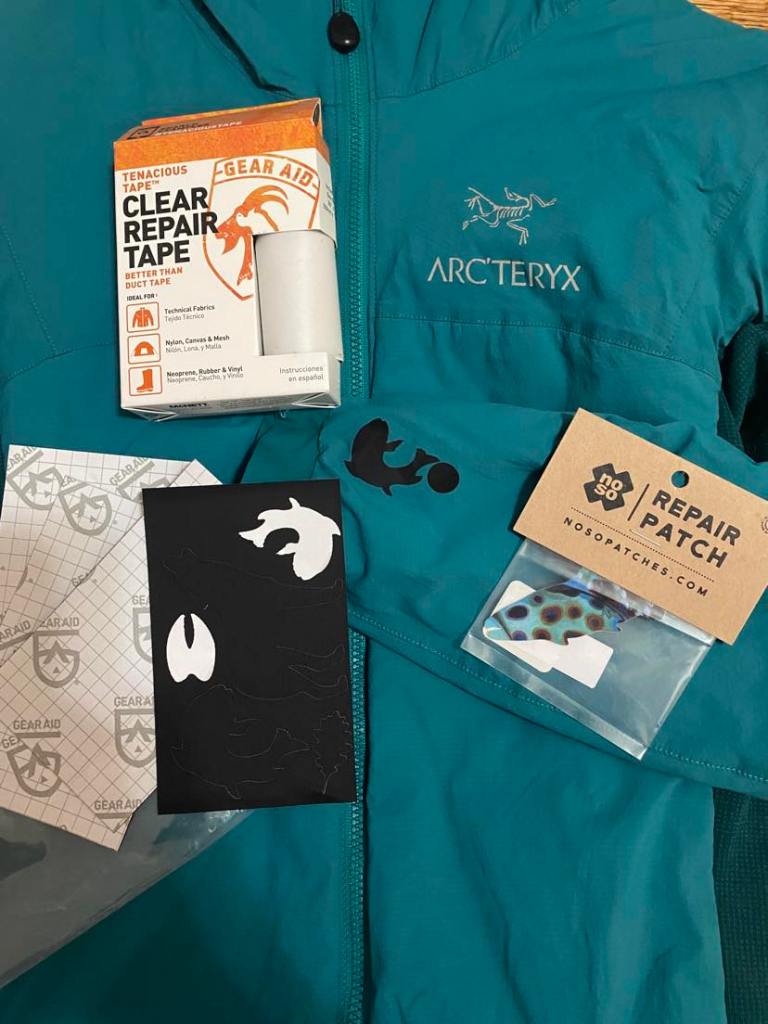
If you are using your stuff though, accidents happen. Fires will send embers, ice tools will snag….I like to have a selection of patches on hand.
For repairs in waterproof fabrics, I haven’t found anything better than Tenacious Tape. I can think of 3 items off the top of my head that have been holding strong with it for about 5 years. Read the directions; which essentially say start with a clean item-and make sure you cut your patch to have rounded edges, corners will snag.
You can see I’ve used plenty of the black patches, also from Gear Aid, for miscellaneous nylon repairs. They are super handy and look cute too. When I find patches like the NoSo Patches that I particularly like, I’ll buy the to have on hand when I inevitably need them. Having things to repair your stuff at home, means it gets done right away before it can get any worse. It will also make gear maintinence more fun and less of a chore.
I recently purchased a down vest from Patagonia, and on the tag was a mini repair kit with patches that matched the color of my item, one of the coolest things ever. Patagonia has a big sustainability piece in their business model anyway, and encouraging adventurers to repair their items is one thing-setting them up for success on the day of their purchase is amazing. I love it. I like to keep repair items that I find, or that come as spares organized in a bin or two for easy access. Buckles, zipper heads and all the patches that come with your gear (sleeping pads for example) can get lost-keep them all in a bin and thank me later!
That’s all for now folks! Let me know what you think-follow along here and on Instagram for more. Happy Repairs, hope you have a chance to get out and enjoy some Days Off!
